Monday, October 31, 2011

The Eye of God or All Seeing Eye or Eye of Providence,

The Eyes of God is a well known ancient symbol which is  can be found in many ancient mostly religious culture. The Eyes of God is also known as All seeing eye, Eye of Providence etc. Also thing that make it so familiar is that the eyes of god is a part of the Great seal.

US Great Seal Reverse
Ecodemocracia6Second Great Seal of the US BAH-p257

On the above picture we see the images of an eye above the pyramid. In 1782, this symbol was taken as a part of Great seal on its reverse side. On the above pictures as we see on the upper side of the the words Annuit Coeptis the meaning of this words are "He approves (or has approved) [our] undertakings", and under the piramid we see the words Novus Ordo Seclorum, which means "New Order of the Ages".
Eye of God - Negev n001
Ancient engraving in rock; the "Eye of God"

A spiritual symbol. Some says it means that  humankind in the eyes of god, watched by every second. So chance to cross the eye of the gods.

Also another interesting thing is that a picture taken by NASA by the Hubble telescope also known as The Eye of the God, it is a rare picture which is possibly occurred once within 3000 years.
The Eyes of the God taken by Hubble Telescope
The Eye of the God (This picture is taken from NASA)

Tuesday, October 25, 2011

Single PC to PC Lan or Laptop to Laptop LAN Wiring

In order to communicate among pc to pc  or Laptop to pc or pc to laptop through lan or other network two things must be needed to make this happen. One is the data transmission and another is the data reception.  In single PC to PC lan or laptop to laptop lan network no Hub or Switch is needed. Because there are only two network Interface card (NIC) which are needed to connected through single pc to pc lan or laptop to laptop lan connection scheme, hence  point to point connection is possible without having other extra equipment except the communication media.
single
Single PC to PC LAN

So we can use either 10base-T or 100base-TX standard for this. For 10base-T normal speed is 10Mbps. And with 100base-TX you can get speed up to 100Mbps. But 10base-T cat-3 cable can be used but in 100base-T cat-5 cable is recommended.  But it is always recommended to use 100base-TX standard for this single pc to pc or laptop to laptop or pc to laptop lan.

Both 10base-T and 100base-TX use one 2 pairs of cable from 4 pairs of UTP cable. They follow 568A and 568B wiring standards. To know more about this please read the previous article.
So the main thing is, we just have to make a cross cable connection for  this single pc to pc or laptop to laptop LAN. For making cross cable connection, the easiest way for 10base-T and 10base-TX is on the one end of the cable connect with RJ45 connector using 568A wiring standard and on the other end connect with RJ45 connector using 568B wiring standard.
Cross cable connection for Single PC to PC LAN
 The wiring is shown as below
Cross cable connection for Single PC to PC LAN
The overview of Single PC to PC or Single Laptop to Laptop can be understood form the below image.
Network Diagram of Single PC to PC connection
The pin numbering of the RJ45 connector is also very import. The below image will show how it is done.
RJ45 Numbering Scheme
This is how one should do the Connection scheme for making the single pc to pc or laptop to laptop connection easily without extra mechinary except communication media and the RJ45 connector.  

Monday, October 17, 2011

Rulers and Guides in Illustrator CS5

Precision is the one of the most common attribute in case of vector graphics. Hence to create artwork with precise size, alignment, Scale one of the most popular features of Illustrator CS5 is Rulers and Guides. Normally rulers are shown in the left and the top side of the document and the keyboard shortcut for toggling Rulers on and off is Ctrl+r. The unit of measurement of the rulers by default is in inch. But you can change this from the preference window. Go to preference window by pressing "CTRL+K" from keyboard. From the drop down menu select the unit option and then select your desired unit.
preference tab on Illustrator CS5
Preference window
It does not matter how many art work you have opened, every art work has its own independent ruler. When you select one art work then the ruler is changed for the active art work. So you don’t need to worry about the multiple art work.

When you select a content of your art work you can see the coordinate of them also. To see their coordinates go to widow-->Transform or keyboard shortcut Shift+F8.
Coordinate window in Illustrator CS5
Coordinate Window

Another aspect for working with precision in Illustrator CS5 is Guides. Guides work together with rulers to help you to position you art works. To create a Guide if your rulers are not show on the side of the document then press CTRL+r to on the rulers. Once your rulers are visible just click on the ruler and drag it to your document and you see a line came out. From your left side of ruler you will get vertical guide and from the top side ruler you will get the horizontal guide. Hold down the shift key to move you guide with a minimum unit gap. Otherwise it will move freely. After creating and positioning a guide to confirm that it is not moving just lock down the guide. To lock down a guide just right click on your art board and select the option Lock Guides. You can also unlock them on same way when you need.

The another advantage of guides is that whenever you select a art board content and then moving a guide to it, you actually don’t need to move it so precisely as it will come closer to the art work it will automatically snapped with it. Same is also true when you moving a art work to a guides.

In Illustrator CS5 another advantage is that you can transform any shapes into guides. Suppose you need a 3X5 inch rectangular guide. Just create a rectangle and put the measurement values on them and after positioning them keeping selecting it go to View-->Guides-->make guides and they will be converted into guides. On the same way you can also get back your shape. On this way every shape can be converted into guides.

Sunday, October 16, 2011

What is OP1S?

In the modern world industrial sector as the technology getting smarter, the way of representation and manipulation of them also are getting smarter.

OP1S is that kind of optional device that makes the Drive handling operation much easier by working as the substitute secondary display device. But the main function is that it works not only as a display device but also it got some features of accessing drive parameter and modifying them much easily.

OP1S device Picture
OP1S

Also another interesting feature of OP1S is that it has non volatile memory on which it can easily upload parameters from drives. It can store couple of sets of complete parameter set of different drives. And it’s also easy to download parameter sets into drives. And this upload and download function requires no additional equipment. It’s very helpful in case of emergency.

The communication of OP1S is done via a RS485 serial interface using the USS protocol and one OP1S unit is capable of communicating up to 32 slaves with baud rate of 9.6 kBd and 19.2 kBd.

OP1S has a multi language plain text display which also configurable form drive parameter. OP1S also got a numeric keypad with which you can jump over parameter where in case of PMU going from one parameter to another distant parameter is very much boring and time consuming.

OP1S unit connected with SIMOREG drive
OP1S Connected with Drive


Another advantage of OP1S is that OP1S unit is broadly used in different variety of drives which makes it a common device and can be shared with others. Its plug in connection also makes it too popular. When it is connected with cabinet door with adapter plug in when you need and plug off when you need it in another place.

Saturday, October 15, 2011

SIMOREG 6RA70 DC MASTER

SIMOREG 6RA70 DC MASTER is one of the best DC DRIVE series made by SIEMENS. It leads the industrial sector from its very begging of the journey. Also still leading, though a couple of new model drives with some extra feature are released in last couple of years but it holds its position.

SIMOREG 6RA70 DC MASTER is available in different voltage range; they are 400V, 460V, 575V, 690V, and 830V. Also the range can be enlarged by parallel and series operation of them. And it was also the most exciting feature of SIMOREG 6RA70 DC MASTER.
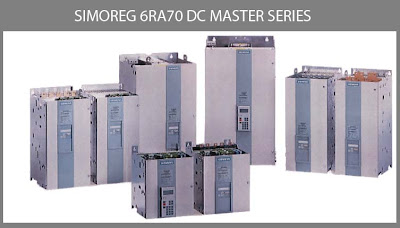
SIMOREG 6RA70 DC MASTER series Drives
Common Features
Some of the most common feature that makes 6RA70 series most popular are as follow:
1. Its user friendly interface.
2. Wide variety of power Range.
3. 6RA70 series make the parallel connection theme so easy.
4. Power consumption of its own is very low, that makes its performance extra ordinary.
5. Anyone with little knowledge can make the commissioning of the 6RA70 but it’s not recommended but it is helpful in case of emergency as every with knowledge can handle it.
6. Can be expanded in a unified modular fashion with MASTERDRIVES standard options
7. The mechanical design it also very compact hence takes smallest area possible.
8. It is also compatible with previous SIMOREG Range.

Basic Electronic Feature

 6RA70 DC MASTER can operate on both open loop and Close loop operation.
 Introduce more flexibility in operation and modification with BICO Technology.
 Drives can optimize automaticaly and make the complex tunning which lead in its smooth operation.
 Easy and structured diagonstic system makes finding faults more quickly also quick hint helps in solving the problem.
 Also can be expanded with freely configurable block.
 User friendly operator panel OP1S.
 No jumper is needed on Parameterization.
 Technology software included in basic unit
 Flash - EPROM
 user-friendly evaluation of alarms / faults
 all parameters can be set-up and monitored
 all parameter sets can be upread / downloaded
parameterization unit of SIMOREG 6RA70 DC MAster
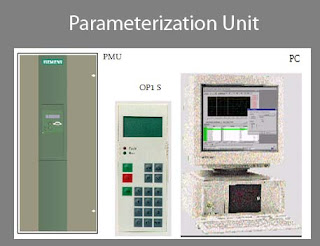
Parametrization unit of SIMOREG 6RA70 DC MAster

Communication Feature

 Using USS protocol communication is done with PC and external control connection.
 Communication through PROFIBUS-DP
 Direct drive-to-drive coupling (SIMOLINK) communication option also provided.
 Peer-to-peer connection
 1 x RS232 (or RS485) for OP1 S or SIMOVIS

Different Slots in 6RA70 DC MASTER

6RA70 Drives has different types of slots to accommodate different functionality devices. They are as follow:

 Encoder (Sensor Boards)
- SBP Pulse Encoder (TTL/HTL)
 Fieldbus (Communication Boards)
- CBP PROFIBUS DP (12 Mbaud)
 Technological link
- SLB SIMOLINK
 I/O-boards (Expansion Board)
- EBx

Operation Range for the whole world is as follow:
NEMA / CSA
3-ph. 460 V AC 60 Hz
3-ph. 575 V AC 60 Hz
IEC
3-ph. 380 - 415 V AC 50 Hz
3-ph. 500 V AC 50 Hz
3-ph. 660 - 690 V AC 50 Hz
IEC / NEMA
3-ph. 380 - 460 V AC 50/60 Hz
IEC / NEMA
3-ph. 380 - 460 V AC 50/60 Hz
IEC
3-ph. 380 - 440 V AC 50/60 Hz
3-ph. 500 - 550 V AC 50/60 Hz

Thursday, October 13, 2011

What is Layer in Photoshop?

Layers are the one of the most amazing feature of Photoshop. It was first introduced in Photoshop 3. You need know about them very well when you are going to work with Photoshop.

But what is the layer in Photoshop? It is a complex process of combining multiple images as individual existence but appearing as a single image. Still don’t understand, no problem, just carefully understand the following example.

Suppose we have white art paper. And on the top left of the art paper we draw a red circle. Then it will look like as follow:
First circle in background layer as art paper
We also have some transparent sheet and all are same size as the art paper, we took one of the transparent sheet and on the middle right of this we draw a Green circle. And we attached this transparent sheet over the art paper. How will they look like? Just as like as follow:
Second types of layer as transparent layer
On the same way take another transparent sheet and draw a yellow circle at the middle bottom position and attach it with the art paper. Then their appearance will be as follow.
Final appearance of layers
Now see what we have? We have One art paper and two transparent sheet attached together. But if you see them all together they will look like as whole such that it is only one object.

Layer in Photoshop is like them. Compare the art paper as the Background layer, and compare the transparent layers as the other layer in Photoshop.

The Background layer in Photoshop in different than all other layer on the way that it is not transparent and you can delete any pixel form it rather it will fill with background color.

Cropping from Angled Image in Photoshop

Now we will reveal another great feature of the Crop tool in Photoshop. Suppose you have to crop from a picture where the picture content is not as we see in general straight, rather it is angled. Then how you crop form this type of picture and also straight them. Look at the picture below:
An angled image which is angled
Here on the image you see a picture is hanging on the wall and also the picture is angled. You see on the image a man and a woman together in a frame. And they are you target and you want to crop the frame from the image. How can you do that?

First Open the Image with Photoshop and press "c" or click on the crop icon to get the crop tool. Now draw a rectangle around the frame as shown in the below picture.
Cropping from a angled picture
After you draw a selection area then on the upper side just below the menu you see a crop tool option menu bar appeared. Here you see a check box named perspective.
Perspective check box of Crop tool, Which makes you able to free transform every corner of selection
Check the check box. Then you will be able to drag every corner of your selection independently. Now click and hold at the corner of the selection and drag it to the corner of targeted frame like as below:
Corner points, click and hold click to drag them independently
Drag every point on to your targeted image till you are satisfied.
Crop selection fine tuning
After you make your customize selection of the target portion from the image, then Press enter or the return key to delete the unwanted pixels from the image and make your target selection straight as show on the below picture.
Final image after cropping form the angled picture.

Wednesday, October 12, 2011

Drawing a Canvas with Crop Tool

Crop tool is generally used to crop a selected portion form an image. But with this crop tool can do more than that. Crop tool not only cut the length but also some time increase the image. Now we see how we can create a canvas using this crop tool.

First open an image with Photoshop. Convert your Background layer in to general layer. You can do it easily by double clicking it and pressing the ok button. Now after the image is opened zoom out the image as long as you have full comfortable overview of the image. Then select the crop tool by pressing “c” from keyboard or by clicking the crop icon. Now with this tool click on the outside of the corner of the image and drag it to the last point of the image to select the whole image area.
Selecting the Image with Crop Tool
Now with this selection move your tool to the corner point or side point, you see you can drag this area outside making the selection large. To increase area in all side equally press alt key and with you hold click and drag outside, selection area will increase equally in all four side. Drag in one side if you want to make selection large in one side. Now press enter after your selection. You will get a large canvas with your image.
Selecting Image canvas equally in all side of the Image
Creating first transparent Canvas
Now you can set a background color. To do so, just create a new layer and drag it below the current layer and then with new layer selected from Edit menu go to fill option and select the fill color. Your background will show. Choose a color.
Selecting Background color for the Canvas
Now design your canvas as your choice. Such as, you can put a stroke around the picture. For doing so with image layer selected go to Layer->Layer Style->Stroke. Increase the stroke size as long as it looks good. You can give either outside or inside stroke.
Adding Stroke in the Image within Canvas
There is also another easy way for creating canvas. Photoshop has its own direct command for creating customize canvas. But knowing ways is always good. One thing can be done in several way. On this shortcut way first open the image with Photoshop and then from Image menu go to Image-->Canvas Size.
From this Image size dialog box, if the relative checkbox is unchecked then you will see the full image size. Now if you want a canvas around the image then add the number with the actual size and put it. But if you check the Relative checkbox, then just put the only increased size on the textbox. And your canvas will be created automatically.

Hide Instead of Cropping Image in Photoshop

Crop tool is used to delete the unnecessary part of the image. By this you actually delete the pixel which you will not get back. So it is a destructible procedure. But there is another process to avoid this deletion of pixel. It is hiding the selection that you don’t want to show. The main advantage of this process is that it is non-destructible and you can get every detail when you want to get back. Also after making a selection if you don’t like it you can also change it, as all the details is still there.

Now we will see how we can hide a selected part of the image. First open the target image with Photoshop. By default if you don’t take any extra layer then it will open in the Background layer. The trick to hide the selection of image required a layer that supports transparency. Background layer is a special type of layer and you can delete part of pixel in it also not support partial transparency. For the hiding trick you first you need to convert this Background layer into a layer that supports transparency.
The traditional Background layer of Photoshop
The quickest way to convert that just double clicks on the layer and on the shown dialog box you can give a new name and click ok. So the special Background layer converted into a layer that supports transparency.
Converting the Background Layer in the layer that support transparency
Now again take the crop tool by pressing “c” or the crop icon. Just click and drag down on the picture and select your area of selection. But do not press enter or the return button. This will delete the pixels. After selection you will see on upper side crop option bar item been changed and you will see a delete option and a hide option like as follow.
Hide and Delete options of Crop Tool
Normally before selection you won’t see them. From these two radio buttons select the hide radio button and hit enter. You see the area outside your selection disappeared. But don’t think they are deleted. They are still there. Form this stage you can change your selection too. How? Select the move tool by pressing v or the move tool icon. Click on the image hold it and move it, you will see the image is also moving you see on your selected are the whole image is showing as window.

For getting back the original image from menu bar go to Image->Reveal All and you will get your image back.

So it is always better to use this hide trick instead of the cropping the image.

Cropping in Photoshop

Press C from keyboard as keyboard shortcut of crop tool or click on the crop icon to get the general crop tool. By default it is a free from crop so just click and drag through the image for selection of the portion of the image to be cropped. Also can edit any time you want. To cancel selection just presses the escape button. Press enter or Return button to delete the pixel outside of your selection.

But in free form cropping size controlling is very difficult. You can set the size and resolution of cropping. When you select the crop tool then on the upper side you see the crop options where you can set your required width and height and resolution manually, also you can use some preset options from the same option bar.
Cropping Tool Options
After you select a preset or manually set the parameters, as you click and drag the crop tool over the image it will follow a proportional value of your set value.

How big print can be made from an Image?

You got a digital image, now how do you know that you have enough information to take a print of any size. So the question is that what is your print size limit and how can you know? It is easy and tricky. Suppose you want to make a 4X8 image print, what will you do?

Open your Image in Photoshop. Now from Image menu go to Image Size. Here you see you digital Image picture.
Image Print Size
From the Image Size dialog box uncheck the Resample Image option.
Uncheck Resample Image
Now On the Resolution text box put your printer resolution. Most of them have some common values. Such as the resolution of Ink jet printer is 240 pixel/inch. Now put the resolution on the resolution textbox. You see the width and height of the image on the second portion of the dialog box changed to some lower value. What value you see on the Document size portion is the maximum size that you can print without up sampling the image with current set resolution.
Setting the Image Size
Now to change the size with your desired one again check the Resample Image checkbox. Change the width and height. Now you will see resolution not changing. If you don’t want you width and height don’t change proportionately than uncheck the constant proportion checkbox.
customizing the print size of the image

Tuesday, October 11, 2011

Resizing and Resampling of Image in Photoshop

I suppose you are thinking that how could it be hard to change a picture size. The answer should be you are doing not knowing what you are doing. Even for professionals the size changing dialog box of Photoshop is somehow confusing. Let see what is all about?

Suppose you have very high mega pixel camera and you take a picture and you want to create a definite size of print of it like 4X6 etc. Generally what you do is that we go to the image size dialog box under the image menu. After opening the dialog box you will see the showing your current image dimension. Now close look at the box, it has some different part. The first part is pixel dimension consist of width and height of the image in pixel and the second part is the Document size which also consist of width and height and an extra term resolution. At the bottom of these you will see three checkbox which are by default all checked. And at the bottom of the window you see a dropdown textbox with some options. Now we will see why are these for?
The most confusing thing about these Photoshop image resizing dialog box is that it has two modes of operation. It can be used either resizing the image or re-sampling the image. And the term resizing is not an equivalent of re-sampling. There are basic differences between them.

By default the Resample image checkbox in turned on. Now turned this checkbox off and you will see the pixel dimension part of the image turned into non editable mode and you can not changed this portion now which got the pixel dimension of the image. So by turning the Resample Image checkbox off you actually changing how the image will be printed when you hit the print command but not the actual size of the image. Now set your desire printed output size from Document size width and height. One thing you will see that when change the document size height and width smaller than the actual then the resolution will go up and if they are bigger than the actual size then resolution will go down. As the Resample Image option is turned off this changing is non destructible. And you see after changing the document size zoom the picture and you will see no difference between the actual and the changing picture.
Resizing and Resampling Image
Now turned the Resample Image checkbox on and you see the pixel dimension portion is available now because this is potentially lossy operation. You are actually changing the number of pixels in the file. Either you are removing pixel which is also know as down sampling or adding pixels that don’t exists known as up sampling. Now you see when you change any value of width and height in document size portion then the corresponding pixel Dimension portion is also changing but the resolution get unchanged because they are not connected any more. And also from pixel dimension portion you see the size dramatically changed with these changes. Which means the actual file is actually changed. Now down sample a image and click ok and you see the size reduced. Now zoom it up to the actual size before and you see the image is distorting as its size zooming.

So when the Resample Image checkbox is turned on you are not only changing the print output but also changing the actual file.

Now one question is what is limit of up sampling and down sampling. The answer is no limit for down sampling as long as it can be seen, and for up sampling up to 20% can be enlarged without getting noticed with Photoshop. If you need up sampling beyond it then you will need third party software.

Now what is the content you see in the drop down text box. They are the algorithm used by the Photoshop. You see some algorithms which are also mentioned by side on which purpose which one should be used.

Monday, October 10, 2011

What should be the Resolution of your Image?

One the most common confusing part in photo editing is that not understanding the resolution, what is it and on what purpose what resolution should be used. To get a better a answer of these questions first we need figure out on where we are going to use this or what is the final output of the images such as if they are for printing or only for your desktop screen of your monitor or cell phone or for some sort of tablet device means digital display. We can also be more specific means if they are for printing then where they will be printed in a printing press or in your inkjet printer etc. Because the resolution depends on these selections

There are three different categories of output: one is halftone output, second is the continuous tone output and the third is the display output. To understand resolution we have to understand each of them because each of them needs different resolution.

The Half Tone Output
Half Tone is used in the printing press for reproducing images with an illusion of continuous images. For a black and white picture it is just different sheds of black and white dot pattern and for a color pictures it is also dot patterns of for color of CMYK series. So everything those are for printing first needs to be converted in half tone. Now what should be the resolution for these printed output or half tone output on other word? There is a common term used in printed media which is “line screen”. Line Screen is the number of half tone lines used per inch. It is often expressed as “LPI” lines per inch. Without going deep simply line screen depends on the paper quality and the printing press. You may not know what line screen you are using. But there is some default standard of line screen value. The general thumb rule for selecting resolution is that resolution will be the as twice of the line screen. The default line screen values for some area are as follow:

• For Newspapers/publications which are printed on newspaper use a 65 or 85 lpi.
• For Books printed on uncoated stock use a 120 or 133 lpi.
• For Books and magazines printed on coated stock use a 133 or 150 lpi.
• For High quality books with lots of graphics on coated stock will use 150 or higher lpi.

You may not know what line screen you should use but you know what kind paper you will use for your printing such as glossy paper stock, matte stock etc. Each types of them have a recommended line screen. You will know them form the printing press. Once you know the line screen then your resolution problem is solved. Just double your line screen and you will get the resolution.

We used to say that higher resolution means higher quality of image but for offset printing it is not true. For a 100 lines per screen printed media the resolution should be 200 pixel per inch but instead of 200 resolution if you use 600 pixel per inch resolution the quality won’t increase. You will get the same quality print for both of them. On the other hand this high resolution will increase your printing time as you are giving more information to the printer.

The Continuous Tone Output
The continuous tone image is the one where at any point of the image each color reproduce as a single tone. On the other words, the continuous tone image is one where the colors and the grey sheds are merged into the neighborhood color and shed. Where in half tone the color and grey shed are like discrete dots. The example of continuous tone image is the Photographs.

In continuous tone image you don’t need to know the line screen because you are not converting your image into half tone dots. You are printing it as you simulating creating a photograph in the dark room. If you see through a magnifying you won’t see dot’s like printing press. And you can relax about resolution as by default you can keep it as 300 pixel per inch(actually a little bit lower then that but who bother to keep that in mind).

Outputting to a Screen
The third category is outputting image in a screen which can be any size. When you are targeting a display monitor of any then actually you don’t need to care about the resolution. The dot per inch doesn’t matter but things that matter is the pixel dimension of the image. You shout set the width and height of the display area in pixel size as the image width and height in pixel. So the most important thing you need to know is the device dimension in pixels.

Resolution only matter in print but when you targeting it for outputting to a screen then resolution doesn’t matter. You can see it, set the image width and height in pixel and then change resolution you see the image size not changing. It means the quality is the same regardless the relolution.

Sunday, October 9, 2011

Different file formats in Photoshop


When even you work with Photoshop, the common thing you need to do is to save it in a file format. When we open a file in Photoshop whatever its file format, it is converted in to the Photoshop document and you work on it. So we will see the difference in various file formats in Photoshop. The most common file formats in Photoshop are PSD, JPEG, TIFF, GIF, EPS etc.

The PSD Format
The working files by default saved in PSD format when you hit the save option. When you work through a file means add layer, edit color, add mask and other lots of things and save it in psd format then when you open it you will got back your working layered file as a whole. Nothing will change. But if you save it in other versions of file format then all the layers will be merged into one and will create a flat version of non editable or limited editable image. One should keep his working file separate from the output file and in the future if any editing needed then edit on that working file instead of other versions of flatten files.

The JPEG Format
One of the most common file format for images is the JPEG file format. Actually it is a lossy compressed file format and commonly used for web, online image, email etc. To reduce the size of file JPEF file format throughout the un-important details from image which depends actually on the size and quality of the original raw image. So it is not wise to keep your work archive alive as a JPEG data. The other reason for this is, when you save as a JPEG file it will be compressed and some data will be lost. Again if you open this file save again then it will compressed again and quality will be degraded. Make changes in only psd files.

The GIF Format
Another common file format specially in web graphic is the GIF format. It is also a lossy format but the difference form JPEG is that the compression happen earlier as in order to save in GIF format the file need to be converted into 8 bit graphic, which means that it can only have 256 or less nos of color shed. This is the main reason that the GIF formats are not used in photographs but in web graphics, the areas of solid color like button, logos, levels, banner, backgrounds etc.

The PNG format
Another file format also used for interactive web content is the PNG file format. Also it is commonly used in flash, power point presentation. The most important features of the PNG file format is that it support the nice real quality transparency. JPEG format is also can be transparent but only one level of transparent, means that only one color can be pick to be invisible or can hide only one color. On the other hand PNG support true alpha channels, masks with 256 levels of opacity.

The EPS format
This file format is used for printing application. When you save a file in the EPS format you are actually pre-printing the file in the disk with a preview JPEG or TIFF file attached with it. The key point of it is that it can not be modified. This is the reason designer choose this file format to keep their design protected from accidental editing. When open a EPS file you actually not open it but open a preview file of it.

The TIFF format
TIFF is the other file format which is also used in the printing application. The difference between EPS and TIFF is that TIFF file format is more flexible then the EPS file format, say you can change the color values in the TIFF file fomat.


JQUERY Selectors and Filters Basics


As the name implies JQUERY Selectors and Filters do as they are supposed to do. They select content from document so that the content can be manipulated using other functions may be with JQUERY function or other JavaScript functions.

In a brief the JQUERY selector returns an array of objects that matched the selection criterion and the JQUERY filters are there to refine the selection the selector returns.

The content that the JQUERY objects return is not DOM elements but JQUERY elements wrapped by JQUERY objects so then they can be further processed using lots of predefined JQUERY functions.


The most important features of using JQUERY selectors and filters is that they are build as CSS syntax, that makes then easily understandable as CSS is most commonly used and everybody is familiar with it.  Here are some selectors that directly use some CSS part.

Such as The tagname selector finds all the elements within the tagname, #identifier selector finds elements with ID of identifier, .className selector finds the elements that have the class attribute with the value of className, tag.className finds the tag elements that have a class with the value of className, tag#id.className finds the elements of specific tag that has a ID value of id and a class attribute with class value of className. And * finds all the elements on the page.

JQUERY vs DOM: an example

Here is an example that helps to show that how easy JQUEY makes to find elements. First just consider the following HTML file:

<html>
<head>
<title>My JQUERY Example</title>
</head>
<body>
<div id = “container”>
Here goes some list of element:
<ul id=”ullist”>
<li class=”first”>Element 1</li>
<li class=”first”>Element 2</li>
<li class=”second”>Element 3</li>
<li class=”third”>Element 4</li>
<li class=”third”>Element 5</li>
<ul>
<p>a test paragraph 1</p>
<p>a test paragraph 2</p>
<p>a test paragraph 3</p>
</div>
<body>
</html>
This is a very simple HTML file, now if we want process it further then we have find the content first.

Now the code for finding all elements with “ullist” tag in DOM is as follow:
document.getElementById(“ullist”);

In JQUERY the code will be:
$(“#ullist”);

To find all <p> tags
In DOM : document.getElementByTagName(“p”);
In JQUERY: $(“p”);

Now if we want to get all the class “first” form all the <li> tags then it will be more complex in DOM. In DOM first all the <li> tag needs to find out using getElementBYTagName, then with a for loop have to compare all the class with “first” to find out the which class value is “first”.

On the other hand it is very easy in JQUERY.
In JQUERY the code will be:
$(“li.first”);