Sunday, July 31, 2011

Symbols : Flower of Life

Type : Ancient Symbol
Known As : Flower of Life
Flower of Life : Image courtesy : wikipedia

Mostly known as a religious symbol as it is found in most religion. It is a sacred geometrical shape. Some religious people believe this symbol has healing power and they made this symbol shape with metal and wear it for healing.


Some other symbols are closely related with flower of life.

Tuesday, July 26, 2011

Carbon Brush

About Carbon Brushes:


For many years inventors were trying transmit current form a stationary body to a rotating body. It was the main obstacle in rotating machinery. Finally they found out a way. Initially it was done by bundling copper wires and fixed then with stationary body and keep contact with the rotating body. In this way the copper bundles looked like paint brush. And the word brush came from there. 

With the development of knowledge and technology and after years of experiment finally a well structured process invented. Now in almost all modern technology different grades of carbon blocks are used as the transmitting medium. Though they don't look like brush but as a tradition they are well known as carbon brush.

With the help of brush holder and spring the remain touched with the rotating body and transmit current.

Why Carbon is Selected as the medium?

About Carbon Brushes:


In all modern technology for transmitting current from a stationary body to a rotating body carbon brush is used. The main reasons for using carbon are as follow:

a) First of all is its conductivity which is as like as metal.
b) The main disadvantage metal is that in some temperature metal melts. Most often metal welded because of this property. On the other hand carbon does not melt. It does not hold any liquid state. It vaporize directly from solid state. It is another very good advantage of using carbon brush. No probability to be welded with commutator or slipring. Also its evaporation  temperature is also too high. It is almost 3000 to 4000 degree Celsius.
c) Carbon is lighter than many metal which also make it's inertia much low and because of this low inertia carbon brush can move easily and smoothly over little rough surface without causing any trouble. 
d) Another important quality is carbon is self lubricating which means low friction. As temperature rises unlike any other metal carbon friction coefficient decreases making it suitable for using in rotating machinary.
e) Chemically carbon is stable and it's expansion is also negligible.

These are some reasons which make carbon as a best choice.

Why Carbon Brushes are split?

About Carbon Brushes:


Generally carbon brushes not used as single blocks. Normally two wafers are bonded with a cushion pad. Three wafers also seen in the industrial sector. Brush sizes and design and grades depends on many criteria and normally is matter of experts.

The splitting is mainly done to increase the contact points. Theories says that the number of contact point does not depend on brush cross sectional area. It is kind of fixed. Normally a carbon block has around 10 contact point regardless with its contact area. So Splitting carbon brushes increase the contact point. If we use two wafer carbon brush then there will almost 20 contact point available.

And also the increased cross resistance due to splitting helps in commutation which is the another good side of brush splitting.

What is Patina?


About Carbon Brushes:


Patina is also know as film or skin over DC motor commutator. It is mainly copper oxide that formed on a commutator surface as a result of reaction among copper, graphite, oxygen and other free particles in some range of temperature. Patina is a very thin film and can easily damaged.
Patina is very helpful in commutation, it makes commutation smooth. So during maintenance extra care should be taken to preserve patina.
Patina color
Normally in good condition patina formed all over the commutator evenly. And the color of patina can be slightly shinny, coppery brown to black. But keep in mind that the color of patina is not that important thing, the important thing is whether they are forming evenly or not.

Bad patina indicates some abnormality of the environment or the motor. Such as high humidity, presence of oil and grease particles, uneven commutator surface, uneven current distribution, low load operation, commutation problem, high resistance problem, raised mica, vibration etc.

Monday, July 25, 2011

Current Density in Carbon Brush

About Carbon Brushes:


Current density is normally expressed as amps per square cm or amps per square inch. Current density is simply the value of current that is passing through per unit area of carbon brush.
There are some points that effects the current density of carbon brush such as temperature, vibration, nature of operation continuous or intermittent, speed etc.
Current density in a carbon brush using in DC motor can be calculated with the following equation:
Current Density Equation
In Brush circuit contact area from Total number of brushes half brushes are used to carry in the current and half brushes are used to carry out the current.

For bottom angled brush the contact area is not just width X thickness but the contact area should taken into account. 

A carbon brush should not be operate in low current density. Low density operation is more dangerous than over density operation.

Friday, July 22, 2011

Facing Problems on Deleting or Renaming a File?

Sometime it happens some files can't be deleted or renamed. In such case restarting the computer helps up sometimes but not all the time. Files can't be deleted or renamed if it is being used in some running process. So in order to make any change on this file first we have make the file free from every running process. There is an easy way for doing such kind of job.It is the Unlocker. Unlocker is a very small free software. You can download it from http://www.filehippo.com/download_unlocker/. Download and install it on your computer.

Now right click on the targeted folder or file that you want to delete or make any change, you will the unlocker option on the right click options. Click on it and you will see the following page if it is used by any process.
Unlocker
Select your action from the drop down menu.

Thursday, July 21, 2011

Create Animation in your PDF File

Powerpoint presentations are so popular because you can add different types of animation and transition effects in a powerpoint presentation. But on the other hand pdf format is also a very popular tool for storing documents as it is un-editable but not for presentation. It is possible to use pdf formatted files for presentation purpose too. You add effects in pdf file.
All you need to do is to download the PDFrizator software. It is free and also the a very small software (3 to 4 MB). First download the software and install it on your PC. Then launch the application after installation.

Now to create your animated pdf formatted file add pages through File-->add files. You can add files from local hard drive or from the net.
Document Tab
After adding files select page by page for editing. From document tab you can define Presentation mode. Whether you want a presentation for the page or not. From this you can also define some other metadata like Title, Subject, Author name , Keywords etc.


From Page Tab you can define animation types like Transition effect, duration, size, Rotation etc. Add animation page by page as you want. Or select All pages for similar animation.


Now save the pdf document from File-->convert to PDF option and take a look.

Scheduled Email Using Gmail

Suppose you want to send a email to your family or friend in a particular time of a particular day. But you are afraid as you may forget about the occasion because of some reason (may be it happened with you several time). And don't want to depend on your memory. Then if you use Gmail then it is possible to reschedule your email in a timely manner.
Boomerang Ads-on
Gmail has a plug in for Firefox and Google chrome browser named Boomerang for this kind of scheduled mail service.Go to http://www.boomeranggmail.com/ and download the plug in, it will be then installed in your browser. Restart your browser.

After installing Boomerang in your browser log in your Gmail account and you will see a new Boomerang tab at the right corner of your account window. Now click on Boomerang --> Manage tab and you see the following window.
Allow Boomerang


Click on the allow button.


The new Send Latter Button


Now to send mail in compose mail option you will see along with the all other previous buttons there is a new Send Latter button. If you want to schedule your email click on the button and select your desired time.


After scheduling your email if you want to change or removed it before its sending time then go to the Boomerang-->Manage a Schedule Message option and here you see your message and click on reschedule to change it.

Secure your facebook account using two way security

If are worried about your Facebook account and think it can be hacked then this article can help you. Cause Facebook gives a double way security for logging in your account.We normally log in our Facebook account using our user name and password but in this way you will also need a extra code after providing your user name and pass word. This code will be messaged by Facebook in your mobile that you set up in your account. It is not a default option of Facebook so you need to active it.
Account Security


For active this security first log in your Facebook account and then go to Account --> Account Settings. Then On Settings tab see Account security option and click on change.


Check the check box


Check the Require me to enter a security code sent to my phone named check box.


And you will see a new window seeking confirmation about if you are actually going to do it. Click on Set up Now.


Confirmation Code Window

After that you see a message  with a text box seeking a code. With in minutes you will receive a message on the phone number that you gave in your profile. If you want change the number then click on Change my phone. Put the message code on the Text box and hit the submit button. You task finished.


Form now now on you will always receive a code when you will try to log in you account and your account will be secured.


Tuesday, July 19, 2011

Twirl Effect in Photoshop

It is very easy to create some great artwork with twirl effect. First open a new file in your Photo shop.
Arbitrary Drawing

Now Select the brush tool with any size you preferred, take a arbitrary color for foreground. Then make some free hand drawing like as shown.


Drawing with colors


Now Repeat this with some other different colors. Just avoid too much overriding with one color to another and also have some free space among them. All the colors needed to be understood.


Now apply the Twirl effect on this drawing and see how it is changed. You will find this twirl effect form Filter-->Distort-->Twirl.

Final Image

Create Colored Effect on Black & White with Photoshop CS5

Final Image

We see in a full black and white picture some object is colored. We see this type of effect in many professional work. A very easy but eye catching project. Let see how we can do it.


Original Image


First open your selected image in Photoshop Layer.


Copy the original Image Layer


Now copy this Layer from Layer-->Duplicate Layer. We will do the rest of editing on this duplicate layer. So make sure it is selected.


Desaturated Image


Now apply a effect from Image-->Adjustments-->Desaturate. You see the image is converted into most likely a black and white image.


Add vector mask


Now Click on the Add vector mask form bottom of the Layer pallet we see some changes as shown in the figure.


Select Brush tool


Now after adding mash on the duplicate layer now select the brush tool and select a size that is suitable for your picture.


Touch with brush tool where you want color


Now with your brush tool click on image and you see the change. It is gaining it's original color. Carefully touch with your brush tool where you want the color. And then after finish save the copy and enjoy.

Create Rain Drop effect with Photoshop CS5

Original Image


Rain drop effect on the image can make image a master piece. Here is a example how you can create a rain drop effect with Photoshop CS5 without using any extra plug in. Just follow the following steps to create a rain drop effect after doing so you will be able change or make your own rain drop effect.
Brush settings

Select the brush tool and make it's size 20 px and Hardness 100%. Keep your foreground color black. Background color white.


Just make a single Click


Now take a new layer and select this layer. With the 20 px brush tool just click once anywhere on the image.


Now for adding effect open the Layer Style window from Layer-->Layer Style-->Blending options or just double click on the layer.

On Blending options:custom tab do the following changes. Keep Blend mode normal, Opacity 100% and Fill Opacity 4%.

Drop Shadow Mode


Now select the Drop Shadow mode and make the following changes. Select Blending mode as Multiply, keep Opacity 100%, Distance 1, Size 1 and from Quality Select Contour as Gaussian as shown in the picture.

Inner Shadow


Now select the Inner shadow tab change the following settings. Make the  Blend mode Color Burn, Color Black, Opacity 45%,Distance 4 and size 11.

Inner Glow


Now select the Inner Glow tab and do the following changes. Make Blend mode Overlay, Opacity 32%, Color black.


Bevel and Emboss


Now the final stage. Select the Bevel and emboss tab and make carefully the following changes. Select Style Inner Bevel, Technique Chisel Hard, Depth 250%, Size 15 , Soften 12, On shading Angle 90 degree, Altitude 30 degree, Highlight mode Screen and color white, Opacity 100%, Shadow mode Color dodge and color white and Opacity 35%.


After finishing all the task describe above you see the rain drop effect has been created. Now to this whole style latter save this style by clicking new style and provide a name and save it. Now draw different shapes on your image. Look how nice it is look like.
Rain drop Effect

Create Web Image Gallery with Adobe Bridge CS5

For creating a well structured web image gallery with traditional HTML and client based programming language lots of hard work is needed. Also you need have a very good idea about them. 

But there’s another way by which you need not to have any programming skill but a little bit of operating knowledge is enough. The way is to create web image gallery using Adobe Bridge. It’s really very easy and eye catching and customizable. Also has built in function for directly publishing in the web and can also be saved in hard drive locally. 

To create web image gallery, open Adobe Bridge CS5.

Select Output mode graphically from the middle top of the window or just press Ctrl+F4.
Select Output Mode

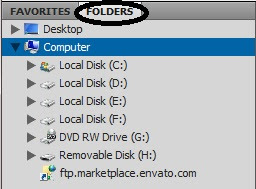
Select File Location


In the Left side of the window you see your hard drive directory. Locate you image files and then they will be shown in the content. Select the images with which you wanted to create your web image gallery. 


Your selected images will be shown in preview.
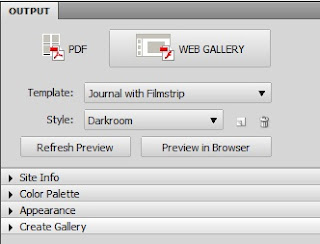
Customization options


Now in Output panel you see two options. One is PDF and the other is Web Gallery. Select the Web Gallery.
From template option right under web gallery option select your choice able template and click on Refresh Review button to check the appearance.
Now customize your web gallery. You see there are four tabs named site info, color palette, Appearance and Create Gallery.
After every customization hit Refresh Preview button to see how they look like.
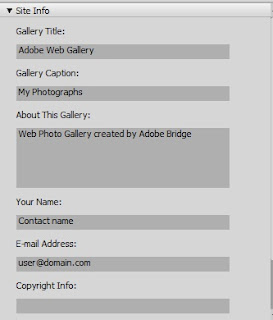

Site Info


Expand the Site Info tab. From Here you customize the Gallery Title, Gallery Caption,  Short description about you web image gallery, you name, contact address etc which will be shown in the page as per your template selection.
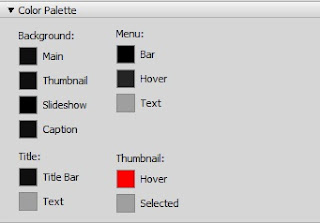


Color Palette


Expand the Color Palette options to customize your background, menu, Title, Thumbnail colors.

Choose a color that is well suited with your theme.
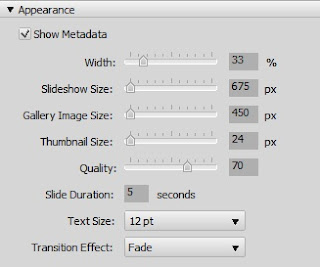
Appearance


From Appearance tab you customize you page width, image size, Slide show image size, Thumbnail Size, Quality of the Image, Text Size, Auto Slide show duration, Transition effect etc.
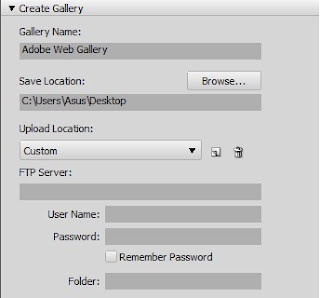
Create Gallery


At last but most important tab is Create Gallery tab from which you can directly publish your web image gallery on the web if you have a web hosting through FTP server option. If you don't you can also save them locally in your hard drive selecting a save location path.


After finishing all this job hit the save button to save it in your hard drive and hit publish button to put it on web after providing your FTP server address.

Monday, July 18, 2011

Create Custom Shortcuts for your Photoshop effect in CS5

Photoshop is the vastly used photo editing software. It provides lots of feature to it's users. One of the most useful feature is creating custom shortcut for a specific function which one you used frequently. It is very useful if you a regular user of Photoshop.

Let you have a image and you want to give a inner shadow effect to it. For doing this normally you have to go Layer-->Layer Style --> inner shadow. When you need such a command frequently it's just a waste of some valuable time. You can make a shortcut for it.

To Customize your Photoshop command shortcut go to Edit--> Keyboard Shortcuts or press Alt+Shift+Ctrl+K ass shortcut. And you see the following window. 
Keyboard Shortcut Window


In the window you see all menu location on the window. Now select location of the effect that you want to use. In this case we are going to use a inner shadow effect from Layer tab.
So you will find this in Layer. Expand layer.


Select effect


Select the Inner Shadow option and choose a shortcut from keyboard that is not used. Otherwise it will be replaced by new one.
Customize Effect


Now open you image and just press the shortcut and you will see inner shadow is shown. Customize it and click OK.

Sunday, July 17, 2011

Finding fault histroy in Simoreg 6RA70 DC Drive

In SIMOREG 6RA70 DC drive there are built in options in the drive to generate various types of fault and store them in drive memory. 

For Diagnostic purpose when a fault occurred we need to see three things from drive. One is fault code or message. It give a overall idea about the fault. The second thing is the fault value. If we observe the drive manual under a certain fault there are some sub options identified by numbers. They are fault value. A fault value help up to be more specific about the fault. And as a maintenance engineer we should always keep an eye on how long the problem takes. The third thing is the occurrence time means when the problem occurred.

All these can be observed in a 6RA70 DC drive. Let see how. 

When a fault occurred it is probable that multiple problems can be occurred at a same time. In 6RA70 at best eight (8) these types of fault can be saved. Means it at the same time numbers of fault occurred then it can save up to eight (8) fault. 

Total eight(8) nos of fault history can be saved in it. Means eight faults from different time slot can be saved and in each time eight fault that occurred at the same time can be saved. When new fault occurred then the last one deleted.

The Fault code or fault value can be seen from the parameter p947 (r947) a read only parameter shows the fault code or message. In this parameter you see total of 64 index. First eight index is allotted for the first at a time occurred fault. Suppose only one fault occurred at a time then index 1 will be filled and other 7 index will be 0. 

The Fault value can be seen from r949 parameter. It is also a read only parameter. It holds the corresponding value for p947 ( r947) index. It has same nos of index like r947

And the Fault time can be seen from r049. It just got 8 index. 
Fault code, value and time

In index one current fault is stored if it is not acknowledged. Acknowledged fault moves to the below. From figure you see only 1,9,17,25,33,41,49,57 index are relevant .

It is a great feature of Simoreg 6RA70 drive. Proper using of fault code along with fault value save lots of time. It is a really helpful tool in industrial sector.


Friday, July 15, 2011

Add Ad Sense Advertisement after your Blog Post Title

First think before taking such step and be careful when doing this because Google doesn't allow customizing ad code. So any change in add code may make your ad-Sense ban.
But it's an easy thing to do. First select ad types and generate your code form your Ad-Sense account. Your Ad-Sense code will be something like as follow:


<script type="text/javascript"><!--
 google_ad_client = "ca-pub-Publisher-ID";
google_ad_host = "ca-pub-Publisher-ID"
/* medium */
 google_ad_slot = "slot number";
 google_ad_width = 300;
 google_ad_height = 250;
 //-->
 </script>
 <script type="text/javascript"
 src="URL of ad js file">
</script>

But to show advertisement right after blog post title you need to edit your Ad-Sense code.Change your ad-sense code as follow:


&lt;script type=&quot;text/javascript&quot;&gt;&lt;!--
google_ad_client = &quot;ca-pub-Publisher-ID&quot;;
google_ad_host = &quot;ca-pub-Publisher-ID&quot;;
/* medium */
google_ad_slot = &quot; slot number&quot;;
google_ad_width = 300;
google_ad_height = 250;
//--&gt;
&lt;/script&gt;
&lt;script type=&quot;text/javascript&quot;
src=&quot;URL of AD js file&quot;&gt;
&lt;/script&gt;

Change the < sign with &lt; 
Change the > sign with &gt;
Change "" with &quot;&quot;
Your modified code will be shown like above example. Do it carefully. Or you can do it using some simple program. There are some websites which also provide this type of facility.

Now the task is to place this code. 
Go to you code window from Design -> Edit HTML. Now using search pallet ( click ctrl+f ) find the following code <data:post.body/> and paste your modified code just above this code. Before doing this one important thing is don't forget to take backup copy before saving your modified code. 

Save your template and see the page preview. Another thing to remember that don't use more than three ad unit or you may face problem of not seeing ad instead seeing some blank space which can degrade your blog appearance. 

Sunday, July 10, 2011

How to add ad-sense advertisement in your blogger blog

Once you have an ad-sense account then you can easily create your ad-sense code and use them in any website or blog in which you have legal access. The easiest way to add advertise in your blogger blog is to add them from design mode. But it has some limitation. In this way you can’t add them anywhere you like. You can only add those as a gadget where you see  a gadget option. Normally Google gives the limitation to use only three ad unit in one page. So be careful because if you use more than three ad unit then it is probable that the excess unit will show as blank which may affect your blog appearance. 

In one way
Click on “Add a Gadget” from Design menu
From gadget window click on the “+” sign of Ad-sense tab and then configure which type of ad you want to add. Finish your task then it will show the element as “Ad-sense” in your design page. Now change the position of the element as you want. Save it and take a look. 
Addind Ad-Sense
 On another way after clicking add a gadget you can select HTML/JavaScript tab in lieu of AD-sense tab. But in this way you need to generate ad-sense code from your ad-sense account. Copy the code and paste it in the content. Save it.
Add Ad-Sense through Script
You will need these options because nowadays there are a lot of ad-sense designs available and you can customize them with more liveliness from your ad-sense account using the tool then you can generate ad-sense code and paste. It gives your ad a better look and feel. But from ad-sense tab (first option)  the customization is limited.

By this way you cannot add your advertisement after post title or in post body. Then you have to go through a little bit complex thing. Cause it’s a little bit different and need extra care. Any mistake can ban you. If you confident enough then you can see the following article How to add ad-sense advertisement after blog post title.